Welcome!

By registering with us, you'll be able to discuss, share and message with other members of our community.

SignUp Now!

cib24's 1999 Mazda RX-7 Type RS

June 2015

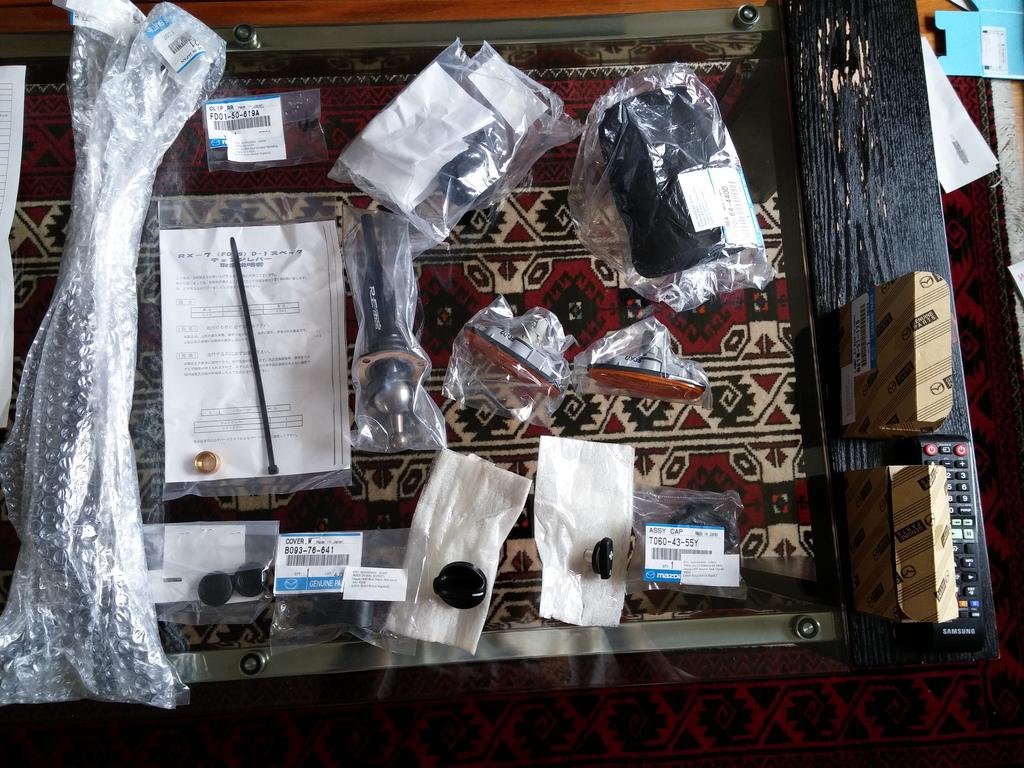
Today, I'm installing a bunch of Japanese goodies as part of my quest to bring the car closer to its factory glory (except for the RE-Amemiya short shifter which I want to try out):
VVSZJN6.jpg


QoHBC7h.jpg


Following on from that I have ordered a few more goodies from RHDJapan (love those guys as the customer service is fantastic and their prices are actually really good).

Dixcel Front and Rear 314mm FP brake rotors
I needed replacement rears but given the fact that this car will see the track and the fronts look a bit thin I thought I would try these out as they are massively cheaper than buying OEM discs:
http://www.dixcel.co.jp/en/rotor/rotor_fcr.html

Project MU HC+ Front and Rear Pads
RHDJapan had a good sale so they came out to be less than Ferodo DS2500s or Carbone Lorraine RC5+ brand new. I will probably try the others in the future though at some point.

Mazda OEM front lip
Although mine was just freshly painted white and looks fantastic I think I want to go back to a black front lip so the front looks as it is intended to look.

Mazda OEM Exterior door triangles (above the mirrors)
Mine look like shit currently.

Mazda OEM Door handles
Questionable whether I need them but they were cheap when considering the large order I placed and I don't like scratches and fading.

Defi DIN Gauge 3 Meter Combination and Defi Racer 60mm Boost Gauge
Defi Advance ZD was on backorder for a while and I need something to fill in the blank space above my CD player.

This means I will have a Defi Advance Link Advance Control Unit and a Defi Link Advance CR (White) 60mm water temperature gauge for sale at some point in the future.

SARD oil pan drain adapter for oil temp gauge
It was less than £3 and I know it will fit perfectly.

Cusco oil catch can -
RHDJapan had a sale and I couldn't help myself to start adding shiny bits to the engine bay.

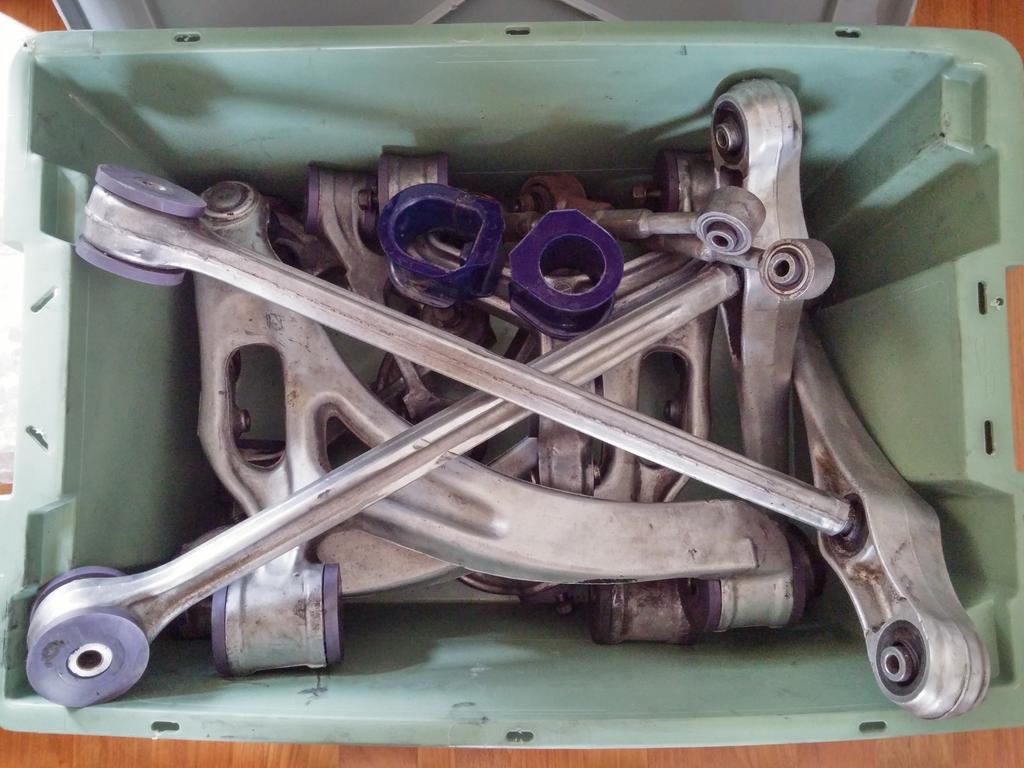
I also bought a used Apexi Power FC and Commander (which isn't the new LED unit unfortunately), an Ultra Racing Strut Brace, and the complete front and rear suspension for an FD with purple PowerFlex bushings already installed and with less than 3,000 miles (and brand new purple steering rack bushes)...Luckily they also have OEM pillowballs with less than 3,000 miles and OEM rubber bushings in the critical locations (toe link and trailing arm).

I have no idea when I will install the suspension arms and I'm a bit worried about endless squeaking but I'll try to get around to it this year.
dCM1QSZ.jpg
 
June 2015

dDFDe0D.jpg


JfFb28K.jpg


ddSI85c.jpg


XuB16RF.jpg


RFvbCoH.jpg


Nice and OEM now!

I haven't put the new wiper arms back on yet as I'm fitting the cowl grille in the morning but look at the difference. The original wiper arms have been painted before but are still corroded as all hell.

3QTPAvr.jpg


Underneath the cowl grille it is very dirty as I guess you would expect. I will try to clean it up in the morning but I'm not expecting much as the dirt is probably 16 years old.

9JIUDjN.jpg


nw1FfRe.jpg


I finally replaced the brake fluid reservoir cap.

b55x1m0.jpg


vVuzBxJ.jpg


I tried to fit this today but I don't think it's going to work. the holes on the brackets are too large for the nuts that I am supposed to use, and even if that was my only problem both brackets didn't seem to line up no matter what I tried...[I sold this eventually, POS]

iwYFYUV.jpg
 
June 2015

I discovered that the plastic shift collar was broken in bits so I dug it out and put in the RE-Amemiya brass one that came with the shifter. At the same time I changed out the centre console arm wrest for the new one and here is the difference between old and new. The Defi Din gauges will go right above the CD player when they arrive. I also want to get a flat bottomed steering wheel to replace the Momo that's on the car at the moment as my knees are in the way:

ryruCPJ.jpg


nLyK50Z.jpg


hvd9FUF.jpg


NfH2IEF.jpg


9Zxk3Ih.jpg


I found some Yen in my car as well which I hadn't noticed before (happens when you have only owned the car for a little while and haven't spent much time with it)

SxhdV3f.jpg


The first thing I did this morning was install the new cowl grille. I cleaned up the area underneath as best I could and it looks much better (not that I will ever see it) but you can only do so much when dirt is that old and some of the paint isn't there anymore.

0CJVu5e.jpg


Old grille vs. new grille:

fY2dXIX.jpg


These were a real pain to take off of the car as they wouldn't come off with the grille. Lots of wiggling with pliers and cursing:

nPAbl0R.jpg


Now it looks nice with the new windshield wiper arm on the driver's side. Unfortunately the passenger side wiper that I was sent was the wrong one and so I've got a new wiper installed with the old one.

wyx3Cxt.jpg


At least the rear wiper was the correct piece:

9E4hAQN.jpg


Slowly but surely the car is coming together and whilst the outside now looks great the interior is where the next part of the focus needs to be.
 
July 2015

Took the car back to the body shop at the beginning of July and showed them the issues:
  • Inconsistent thickness of paint. Some very noticeable thin areas around the car.
  • Large amounts of orange peel on the roof, sides of the car behind the passenger windows sloping down from the roof, the bumpers, etc. It is visible from a great distance and you can feel it with your finger.
  • Serious scratches primarily on the roof, bonnet, below the rear window, and elsewhere.
  • Pigtails, hazing, micromarring.
  • Trapped dirt (little bumps along the paint) below the clearcoat from what is thought to be from a dirty polishing pad.
  • Chips.
  • Paint flaking.
  • Possibly even paint blistering.
Of course they disagreed but the owner said he would fix things by polishing most of it out (although Offset Detailing said this was basically impossible) and respraying what needed to be redone...I told him to figure it out and to let me know when to return.

Unfortunately when I returned the car looked arguably worse than when I dropped it off and to make a long story short, I lost a few thousand pounds and this experience left (and still leaves) a bad taste in my mouth. After this experience I almost sold the car as I was so frustrated and upset. No need to expand further but if you want to now more send me a message.
 
Last edited:
July 2015

Took the car back to Offset Detailing to try to make the best of the paint. I told him correct where you can and then use a polish/sealant combo that hides imperfections as much as possible. He did a hell of a job. You can still see the issues but the amount of shine he got out of the thing distracts everyone that doesn't know where to look for problems. He also cleaned out the interior and sealed the wheels with Gtechniq.

P6IImet.jpg


uhBmUDM.jpg


GNMiskX.jpg


pGKGPa8.jpg


nkKhRiT.jpg


PkYBFHP.jpg


ItxtAjo.jpg


CWwygEH.jpg


VcOUfI5.jpg


96OfJtf.jpg


12ViWSp.jpg


5mWbB8x.jpg


ZYquVXN.jpg


xBT8ZbB.jpg


OSWDscq.jpg


TbrWSdX.jpg


He wet vacuumed the carpets, floor mats and seats and this is what the water looked like...

ZiwTLSf.jpg


The engine bay seems to have cleaned up very nicely as it was so damn filthy in there before (although it was hard to show in photos):

s0uUKze.jpg


W6E1ptr.jpg


slE2lzN.jpg


LSGmcVb.jpg


k2sKnZA.jpg


qw4k7Yu.jpg


SjruHtJ.jpg
 
July 2015

My new toys arrived yesterday (ok the strut brace arrived earlier) which I'm looking forward to installing at some point in the future. I definitely won't be installing the discs until I've sorted out the right way to paint them along with the calipers.

AVveML1.jpg


oS9BXb4.jpg
 
August 2015

After my holiday I decided to look into installing the gauges last night to determine where the best place to tap a boost gauge, water temp gauge and oil pressure gauge was (oil temp gauge will go in the sump).

I'm assuming the boost gauge will tap into the nipple on the upper intake manifold, but I'm left curious where the factory boost gauge on my car is plugged into since I couldn't figure it out. It must be tapped into one of the many vacuum lines somewhere (does anyone know?):

uRFhjXu.jpg


The water temp gauge that is currently on my car is tapped into here so I will just replace it for the new gauge and I'm assuming teflon tape is enough:

6taAoLK.jpg


I've been told the factory oil pressure bung is located on the rear iron near the spark plugs and the only thing I could see was this hole in the rear iron which wasn't blocked off. Does that seem right or am I looking in the wrong spot? This is located above the rear spark plugs.

7DE4thN.jpg


Two more questions. I was looking behind the UIM and noticed this bent tube. I couldn't see what it was plugged into and whether or not it was just a carrier for wires but does anyone know what it could be? If it is supposed to be passing vacuum then I'm not too thrilled by the creases although the car runs just fine anyway.

CEB2af2.jpg


Finally, I removed the airbox guide and noticed that the holes in the factory intercooler duct were covered. I've read that this is a good thing to prevent the intake from scavenging air from the intercooler duct but I'm curious to know if this was a factory thing on all Series 8 cars or if this was an aftermarket modification by a previous owner?

CCj8DXb.jpg
 
August 2015

So, I was in the process of installing my boost gauge this evening and all was going well until I couldn't find a suitable location for the Defi sensor. You are supposed to run a vacuum line from the UIM to the sensor and then connect the sensor to the gauge via the supplied wiring. However, the sensor is supposed to be mounted so the vacuum line and electrical connection are facing downward. Eventually, I realised that the sensor could coexist with the bracket from Cusco for the oil catch can I purchased (and this bracket would also allow me to connect my Toad Alarm siren to it as well.

bnXDBoR.jpg


zwK72Ls.jpg


xYzXOlu.jpg


But then I started looking at the supplied hardware and I'm struggling to figure out exactly what to do with one hose for the catch can.

MJcf1CN.jpg


I know I could technically buy a filter and vent the can to the atmosphere but I'm wondering if the outlet should be to the intake somewhere with another hose that I need to buy separately?

I took a photo of my oil filler neck and noticed it was capped off with a nipple at the top although it does have a hose connected to the bottom of it. I intend to take the nipple off and use that.

lWzR8Mj.jpg


The hardware also included this pill which I believe is just supposed to plug a hose somewhere:

gdJgkrd.jpg


Any advice for installing the catch can would be greatly appreciated.
 
August 2015

From what I've read elsewhere the oil sump is the best place to mount an oil temp sensor as it is the point of the hottest oil whereas at the filter it is the coldest (well, the oil coolers are probably colder). The downside to tapping the sump plug is it makes oil changes more annoying.

I decided to take the catch can off for now. I'm pretty sure I need two hoses. I want to use the lower nipple on the oil filler neck which is routed via a hard line (surprised it is a hard line actually) to the primary turbo inlet. However, because it is a hard line and I only have one hose I can't really install it right now.

I have the boost gauge hooked up but I need to buy a few wire taps to do it properly so I can hook up the ignition wire and illumination wire (instead of just the 12v and ground wire). This is to allow the on/off sequence and so that the gauge is only illuminated when I turn the lights on.

This also gives me a good chance to figure out why my cigarette lighter doesn't work and to figure out if I need to buy two single din pockets or something to house the head unit and the DIN gauges. This is because my head unit currently just sits in there with nothing holding it there except for the wiring behind it...
 
August 2015

So, I'm a bit confused about the add-a-circuit idea for my boost gauge after doing some reading.

The Defi gauges come with four wires:

Red - Battery (Power at all times)
Orange - Ignition (Switched Power)
Black - Ground (Obvious)
White - Illumination (For illuminating the gauges only when you turn the lights on at night)

So, I've already tested the gauge by plugging in the Red wire to Aux power port on the interior fuse panel and grounding the black wire:


The Fuse Box for the Series 8 FD has 3 rows of 5 fuses each as follows:

Stop lights 20A, R. Fog lights 10A, Sunroof/Power Windows 15A, Fuel Pump 20A, Air bag 10A

Door lock 10A, Tail lights 15A, Not Used 30A, Meter 15A, Wiper 20A

Rear wiper 10A, Hazard 15A, Room 10A, Engine 15A, Lighter 15A

These control the following things:

Room: Instrument cluster, Boot light, Ignition key reminder switch, Ignition key light, Door key light, Interior light, Power antenna, Stereo constant power, ECU, CPU No.2, Security light.

Door Lock: Door lock unit.

Hazard: Horn, Relay, Flasher unit (in CPU No.2)

Tail lights: TNS relay.

R.Fog lights: Rear fog lights.

Lighter: CPU No.1, A/C relay, Blower motor relay (heater), Cigarette lighter, Power mirror switch, Power antenna, Stereo acc power.

Engine: EGI main relay, Diagnostic module, Starter cut relay, Circuit opening relay, Fuel pump relay.

Meter: Instrument cluster, Combination switch, CPU No.1, Cruise control main switch, Cooling fan relays No.1 No.2 No.3 No.4, Power antenna, Rear window defroster, Rear washer motor.

Fuel pump: Circuit opening relay.

Air Bag: Diagnostic module.

Sunroof/Power Window: Power Window switch.

Wiper: Combination switch, Wiper motor.

Rear wiper: Rear wiper motor, Heater control unit, ABS control unit.

My idea for the orange ignition wire is to use an Add-A-Circuit tap for the Engine fuse and for the white illumination wire to use another Add-A-Circuit tap for the Room fuse. However, the Add-A-Circuit taps say they are limited to 10A which I think (from what I have read) poses a problem for the orange ignition wire tap since the Engine fuse is 15A.

So, can I add an Add-A-Circuit tap for the orange wire to another fuse on the box to get the same effect and avoid having an amp mismatch?
 
August 2015

I was busy drinking at the Great British Beer Festival this weekend so I didn't get a lot done from Thursday onwards but Sunday afternoon and last night I had a chance to finish some of what I set out to do.

Whilst installing my boost gauge I decided to take the entire gauge cluster out and calibrate the speedo. Let's just say the calibration screw is much more sensitive than I thought! I barely turned it a corner turn clockwise and now instead of being c.8mph too fast I'm about c.20mph too slow! Lol.

I also took the time to remove the Defi Advance CR water temp gauge and the Advance Link Control Unit from the car since I won't be needing it as I'm using the DIN gauge setup instead. NOTE, I will be selling this once the DIN gauges have been installed. As I was doing this, I also discovered a few spare wires not connected to anything (looks like another gauge was installed at some point) and removed these.

I also found the one and only Double DIN bracket to house my head unit and DIN gauges. It's a Kanatechs UA-T39D from Japan and it cost me about £60 (ouch) but at least I know it will fit correctly. I also ordered two Super Pro Diff to Crossmember bushes as mine are shot, a fuel filter, and some tranny and gear oil (haven't changed these service items since I bought the car so it's worth doing for peace of mind).

The boost gauge is now installed and is very useful since the factory gauge reads in mmHg and is not very clear. My only gripes are that 60mm is a bit too large for me and the light is very bright at night and is much brighter than the factory S8 illumination (which doesn't include a dimmer switch like older models!).

I have a few questions about what I'm seeing on the gauge:

Vacuum readings
  • Idle (neutral) - 0.5-0.6 kpa
  • Idle (clutch in 1st) - 0.4-0.5 kpa
  • Driving foot off throttle in gear - 0.7-0.8 kpa
For a turbo Buick Grand National this is good vacuum where my former car had about 12-15 in Hg at idle (0.4-0.5 kpa) and about 18-20 in Hg when driving (0.6 - 0.7 kpa). How does this compare for an RX-7 that presumably isn't ported?

Boost Spike
Went out for a couple of 3rd gear pulls from about 3,000-3,500 RPM last night to see where the car was boosting and noticed the following.
  1. Primary turbo boost: c.0.75-0.8 Bar (maybe slightly over)
  2. Secondary turbo boost from 4,500 RPM: Spike to just under 1.0 Bar and then settles/fluctuates between 0.8-0.9 Bar (could be slightly lower or higher)
  3. Loud air fighter jet-type whistling noise when second turbo comes on (didn't notice before). Sounds awesome though...
Factory boost should be about 0.75 bar but with my Apexi intake filters and Fujitsubo catback I expected it to be a bit higher, but not that high. Especially, when considering that I still have the stock cat and the fact that the Fujitsubo catback on my car is not the most free flowing. Anyway, I only made about 3 pulls because I kept seeing boost spike to about 1.0 Bar on my stock ECU when the second turbo would come on. The car didn't buck or anything and it pulled like a damn train, but due to what I was seeing I didn't keep my foot in it beyond about 7k RPM due to being quite nervous with what I was seeing.

Any advice would be greatly appreciated, and I expect that diagnosing the boost issues and the jet fighter noise won't necessarily be easy since it could probably be any number of things (hoses, valves, wastegate, etc.).
 
January 2016

Thread is back from the dead!

The last time I posted any progress was in August 2015! The reason that this thread has been dormant is because my car hasn't been getting driven much since that time. I work in the oil industry and the low (and declining) oil prices has meant that work has been non-stop with almost no time for recovery, even on weekends. However, it's a new year and my wife was tired of storing coilovers, exhaust parts, brake rotors, gauges, suspension arms, etc. in our 2 bedroom flat so my New Year's resolution was to find the time to get back to it and so I'm going to give a little update, with more to follow when the weather is a bit better.

However, first I have to show off my old ride which I gave to my father when I moved to London over 5 years ago. I went home in October for my close cousin's wedding and had a chance to get reacquainted.

It is a 1986 Buick Grand National that is almost 31 years old! It runs a 3.8L V6 turbo and makes about 250 bhp and 350 lb/ft at 12-13 psi. Redline is only like 5,200 RPM but way back in the day I ran a high 13 second 1/4 mile with nothing but drag radials and 14 psi of boost. She's a hell of a looker and I miss cruising around in it but otherwise it's a boat with no turning ability and very small brakes (drums in the rear!).

dnpf4Pd.jpg


c25oCr7.jpg


8AzHWbr.jpg


fmdaq9V.jpg


lvadH8b.jpg


msw0Ih3.jpg


aPjzpRC.jpg


I even took it to a Buick GN specialist for a tuneup which helped it run much better, and the mechanic had this beautiful 1956 Chevy Bel Air with an LS3 swap that he was using as his daily!

snUxtJH.jpg


gNtfruU.jpg


Then when I got back to London I saw one of these in my complex parking lot! Too bad it didn't stick around and was only there for a weekend! I'll admit I prefer the older body style though.

It was absolutely mint. What do these go for at auctions nowadays?

j9rAJ0E.jpg


M6wMw3h.jpg
 
January 2016

Anyway, enough gushing over American and Italian classics. First order of business for me was to replace the front and rear speakers and install my Defi DIN gauges (water temp, oil temp and oil pressure) above my head unit.

I wasn't interested in putting in the most expensive speakers and adding an amp or a subwoofer since the RX-7 is not really the best acoustic platform and I didn't want to take away storage space or add unnecessary weight. So, I went with Focals, specifically the ISC 6 1/2" speakers up front and the ISC 5X7 speakers in the rear. The rear speakers bolted in without an issue but the fronts required custom brackets from eBay USA in order to fit in the stock location.

Some pics of the car coming apart:

6YNf060.jpg


DN5b63Q.jpg


Stock rear speakers looked like this and explained all of the crackling...

FiahQP3.jpg


In the front were 6 1/3" Pioneer's (which are for sale by the way) which actually fit the stock speaker brackets and it turns out had nothing wrong with them, but I felt like going Focals all around for a more consistent sound.

Old front speaker, old head unit in the back and other stuff.

7uAppkm.jpg


Interesting to note was that the rear panel on the driver's side wasn't even snapped into the car! Without the seatbelt attached it would have come free because the metal clips were slightly bent. So, I spent quite a bit of time believe it or not bending the clips back and cursing at the car until I got all of them to snap in snugly. Fortunately, now all of it is back in and tighter than ever although I probably should have thought about some light sound deadening.

The next task to tackle was the Defi DIN gauges and head unit combo. However, I needed a double DIN bracket to mount both together in the factory slot, but everywhere I looked there was nothing made to fit in the RX-7 slot! I searched and searched for the right bracket and was really struggling to find anything until I came upon one single thread on the Australian FD forum which mentioned the Kananet UA-T39D.

**IMPORTANT FOR SOME OF YOU**

This was only located in one place, Japan, and at one shop, and only purchasable via Rakuten because Amazon JP doesn't allow you to purchase or request to ship globally. So, for all of you that have been dying to find a Double DIN solution that will snugly accept you head unit and gauges or even just a double DIN satellite navigation head unit then you can only order here:

http://global.rakuten.com/en/store/cps-mm/item/n11713/


N3V6Bkc.jpg


OwlrbXp.jpg


Unfortunately, the price is expensive and with customs and VAT charges I think I paid about £70-75 just for this bracket.

However, it fits perfectly! I mean, not a mm spared and it looks factory. The fit was so good I thought when I first tried to install it that it actually wouldn't work! But I mean it's excellent and I will get pictures for everyone to see as soon as I can.

** BACK TO STORY

So, I got the double DIN bracket in the mail within a week of ordering and tried to test fit the Defi DIN gauges with my existing head unit but it didn't work! My existing head unit was literally too tall by 1 mm, yes 1 mm. So, I had to find another head unit that was the exact height I needed and I settled on the JVC KD-X320BT, which is a CD-less head unit with everything but DAB, and it even has bluetooth voice functionality for taking hands free phone calls, streaming music, etc. It's nicely equipped and the red/white lighting matches the gauges at night so I'm happy.

GKNdEFm.jpg


As for the gauges, I installed the oil temperature gauge in the oil pan using this SARD adapter:

http://www.rhdjapan.com/sard-dren-drain-cock-adapter-m14xp1-5-pt1-8.html

I installed the oil pressure gauge in the factory location as on Series 8 FDs the factory location is blocked off since it isn't used. Finally, I installed the water temp gauge where the old one was tapped into the water pump.

Everything is in there and working nicely but one thing I do notice with the water temp is that during warm up the Defi gauge doesn't rise in sync with the reading on my Billion VFC fan controller, although once warm the temps are within a degree or two of each other.
 
January 2016

The next thing I wanted to do was try to diagnose my boost spike issue at the transition to the secondary turbo around 4,500 - 5,000 RPM. As I said a few posts previously, my car spikes from c.0.8 bar to 1.0 bar on transition and then falls immediately back to around c.0.8 bar and holds until redline. However, I have been afraid to floor it ever since I saw the spike happening after installing my boost gauge last summer so I was hoping to help limit the spike by reinstalling the stock air box until I could get the car tuned.

Fortunately, a fellow FDUKer came to my rescue and gave me his stock box for free so I decided to install it. Now, I had previously seen oil below the intakes before which I assumed was from the previous owner overfilling the oil and a bunch of it spilling into the intake tract, but I didn't expect this much! The photos below are of the primary intake filter and hose.

AsSMbd1.jpg


S9hwRu0.jpg


As a result, I spent a significant amount of time using a powerful engine degreaser all around the filter area of the car and around the front turbo once I had the Apexi filters out. The apexi filters were also aggressively cleaned up (and look much better now). The idea being to see if oil accumulated near the front turbo and surrounding area again to determine if the oil I saw was simply from an overfill or if it was actually coming from the primary turbo.

I installed the stock airbox with a brand new OEM mazda filter and used the stock air guide so now the car is basically 100% stock minus the Fujitsubo cat-back in this photo:

MxUcV7z.jpg


Unfortunately, the stock box didn't alleviate the boost spike so I've not driven it hard since.
 
January 2016

I decided to take the car to Hayward Rotary to have the majority of my parts that were decorating my flat (and pissing off my wife) installed and this included quite an extensive list of parts that I supplied:

  • Ohlins DFV coilovers
  • Dixcel FP front and rear RS rotors
  • Project Mu Brake Pads
  • Calipers checked and painted red
  • HEL stainless steel brake lines
  • Complete front and rear suspsension arms with poly bushings
  • New poly bushings for differential
  • New fuel filter
  • New clutch master and slave cylinders
  • Atkins Rotary braided clutch line
  • New Mazda OEM thermostat
  • New 48mm Koyo N-Flow radiator in stock location
  • Used high flow catalytic converter (stock ceramic one on the car is cracked)
  • Transmission and differential fluids changed
  • New spark plugs

Yes, a lot of this I could have technically done myself but I wasn't able to get to it last year and I tend to work quite late most days so the reality of me getting to it within a reasonable time frame before my wife started listing stuff on eBay was very slim. Plus, a mechanic with a real lift and proper tools did all of this in a couple days whereas it would have taken me who knows how long and how much swearing.

All that's left is for the weather to get better so I can have this lovely Knight Sports down pipe installed along with an HKS Twin Power and an Apexi Power FC before having the car tuned for 0.8-0.85 bar:

dPIJioa.jpg


B6CBEGY.jpg


VqB2c2c.jpg


cJFQzhN.jpg


Since the car is at the specialist right now all I need to do is take the down pipe, HKS twin power and Apexi Power FC with me when the weather warms a bit in a couple of weeks and the salt disappears. So, I am hoping that by the end of February at the latest the car is complete and I can refocus on getting a respray sometime down the road.
 
January 2016

So, I bought some seat rails that I am hoping are UK ones since they are supposed to slide back farther than the Japanese ones in my car, but I'm not sure if these are UK ones since it stops with about 7 notches to spare. I don't have my car with me at the moment so I can't take the seat out and look at the rails attached to it, but for those that know the difference between the Japanese and UK seat rails can you please comment on the two photos below and tell me what these are? It is back as far as it can go in the photos.

H0Plvwh.jpg


a7Sxk4u.jpg
 
January 2016

It turns out that these are probably Japanese rails as the UK ones should only have about 3 notches left when fully extended, not 7 like in the photos above. Oh well, I will just have to continue searching for the right rails or modify them so I can get an extra 1-2" of leg room.

As for the car, everything is now installed, the oil in the intake piping, intercooler and plenum was cleaned up as best it could be, a few vacuum hoses under the plenum were replaced, the oil injectors and fuel injectors were checked and all is in good order except for the coil loom on the car. This was discovered when the HKS Twin Power unit was installed and it needs to be replaced before the car can be mapped safely.

N3A3-18-05ZDetail.jpg

I'm on the lookout for a working used one for a 96-02 FD as it is different from the loom on the 92-95 cars. Once I find one or end up ordering a new one from Mazda I will be able to have the car mapped for 0.8-0.85 bar.

In the meantime I've decided on the following oil catch can for my car which should arrive within 2-3 weeks from the US as it is made to order:

s3_occ_gallery_1001x681.jpg


smc_internal_xrayview_565x378.jpg


smc_internal_design_565x725.jpg


I will install it near the brake booster as it's basically the only place with space in my engine bay, and it will be connected as follows:

Oil filler neck --> catch can inlet --> catch can outlet --> primary intake elbow
 
February 2016

A little update.

The rails I bought were not UK ones so that's a bummer but I've decided to try to modify them to give me more leg room based on the How-To posted by Dark Knight.

All mods are on my car now (except the oil catch can and water injection kit) and the bad coil loom has been replaced. Unfortunately, during the mapping session the car was still spiking to 1.0 bar on transition so the session ended very quickly. The intake manifold was taken off and it turns out that two of the hoses going into the black box (simplified rats nest on Series 8s) were split, and all of the other hoses were rock hard and brittle. So, that appears to be the source of my overboost issue.

As a precaution and in order to do things right I'm going to have all of the hoses replaced, solenoids checked, etc. It kind of sucks that this is going to cost yet more money but at least I will know everything is new. Oh, and at the same time I will install my fast reacting intake air temperature sensor from Triumph.

Hopefully, the car will be finished by Tuesday or Wednesday next week and I can get ready for my first track day on Sunday, 14th February!

When I go to pick up the car I will make sure to have the car put on the lift so I can take detailed photos of all of the mods from underneath the car to show everything in good detail for all of you to see.
 
February 2016

Another update. All hoses have been replaced with Viton which is apparently very expensive but the best stuff ever?

The boost spike issues have been cured and the car was driven around a bit today refining the idle and cruise mechanics further whilst checking the radiator's performance and coolant levels.

The real mapping session is scheduled for tomorrow and if everything goes to plan I will be picking up the car on Thursday!
 
February 2016

34 days ago I dropped my car off at Hayward Rotary in Newbury for a bunch of work and today was the day I got to see my car again! I got up bright and early after stupidly staying up until 1:30am playing Rocket League with some friends from the States online...As a result, I was a bit sluggish getting out of the door and missed my train so I had to wait 45 minutes for the next one. The anticipation was killing me as I have been thinking about this car everyday since dropping it off. So, it was a very nice surprise to be picked up by Carl at the train station in my car which stood out like a beacon of hope amongst the taxis and usual host of dull hatchbacks and minivans.

To recap, I had A LOT of work done on the car which included:

  • Replace all suspension arms front and rear with the arms I supplied. The new arms were taken from a twin turbo V8 FD (I'm sure some of you know whose it was as it was featured on a very famous website). The arms were already cleaned up and powerflex purple bushings with Mazda OEM pillowballs were installed by the previous owner (less than 3,000 miles driven);
  • Replace the differential bushings with supplied Superpro bushings and lube;
  • Replace fuel filter with supplied Mazda OEM unit;
  • Install supplied Ohlins DFV coilovers;
  • Install supplied Dixcel 314mm front and rear FP series brake discs;
  • Remove calipers, inspect, clean, paint red and refit;
  • Install supplied Project Mu HC+ pads;
  • Install supplied HEL stainless steel brake lines;
  • Install fresh DOT4 brake fluid;
  • Replace clutch master and slave cylinder with supplied Mazda OEM units;
  • Install supplied Atkins Rotary braided clutch line;
  • Replace transmission and differential oil with supplied Millers CRX 75W90 NT;
  • Install supplied spark plugs;
  • Inspect ignition system. Discovered bad coil loom. Replacement sourced by myself and supplied for install;
  • Install supplied HKS Twin Power;
  • Remove stock radiator, inspect hoses, AST, etc. and install supplied Koyo 48mm N-Flow;
  • Install supplied Mazda OEM thermostat;
  • Remove original downpipe and install supplied Knight Sports twin tube downpipe (apparently a pain in the ass);
  • Remove stock catalytic converter and inspect honeycomb. Crack discovered. Install supplied high flow RE-Amemiya catalytic converter;
  • Weld in pipe in front of cat to attach the air pump;
  • Replace all rats nest hoses with viton hose after discovery of two split hoses under intake manifold and virtually all hoses being very hard and brittle;
  • Inspect/test solenoids in black box, inspect oil and fuel injectors;
  • Install supplied fast acting intake air temperature sensor;
  • Install supplied FD3S6 Apexi Power FC and map car over a couple of days refining idle, cruise, normal road driving, etc;
  • Map for target boost of 0.85 bar at WOT;
  • Take car for MOT;
  • Laser alignment with Hayward Rotary recommended specs for street/track use;
  • Customer test drive with tutorial for how to use the commander and explain specific details of map. Return to garage and show customer on laptop details of the map and how things function with Datalogit; and
  • Be available nearly 24/7 on the phone to answer all of the customers questions. Go over car in shop with customer and explain everything.

I've probably missed out on one or two things.
 
Back
Top