- Joined
- Jan 12, 2018
- Messages
- 118
Note: This one straddles both Interior and Electrical/ICE, but this felt a better fit, however if the mods feel it should be over there please feel free to move it.
I've been having a few different conversations with people on PMs, most in depth with @tomCTR, about how I fitted my dash, and thought it might be better to put a post about fitting a dash out in the open so others can either learn from it, or add to it with their ideas, suggestions or experience.
Although I will use a Race Technology Dash2 in my examples, there are alot of dashes available from the likes of AEM, AiM, Autometer, Haltech, Racepak, Stack, etc. and the process will be fundamentally the same for all of them.
Mounting
There are alot of options here, from the simple to the extreme:


That said, I feel for most people smoothing out a panel you already have will be the best starting point. Now if you want to see a professional do it please see the following links:
Part 1
Part 2
Part 3
Part 4
For smoothing my dash, I did similar to the linked articles, but where he used ABS discs and plastic blond/glue, I just used fibreglass and resin, but the rest of it was the same:
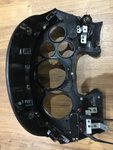
1) I Didn't take a picture of the first step, which was trimming down the gauge holes, then putting take across the front to hold the fibreglass and resin.
2) Once the tape is removed you need to start the process of smoothing. Here was my first pass of filler.

3) Sanded down. Getting closer.

4) Second pass of filler.

5) Sanded off the second pass then covered in UPOL Plastix. In retrospect I would have used this instead of filler in the early stages, as this has more inherent flexibility in it.

6) All smooth after the various filler stages.

7) Coat of primer to confirm it's smooth.

From this point you have various choices. You can bolt the digital dash on the front of your panel, you can sink the dash into the panel, or you could cut an opening for a bigger panel holding the dash and any buttons you need. For my own dash I went with sinking the dash in with a carbon panel behind:

I finished my dash in Halfords Truck bedliner to give it a textured finish, and for that it's great, but it doesn't seem as hard wearing as I'd like, so if I was to do it again I would probably put paint over the top to try and seal it.
For mounting the dash, again you have different options, though the main two will be:
1) Mounting to the panel itself using tabs


2) Mounting it to the existing housing


So that should get you to the point of having your digital dash physically mounted in your car. Other items I would call out, are that some of the better selling digital dash manufacturers sell vac formed or cast panels ready to accept their dashes like this:

Obviously if they do one for your dash, flushing this into your gauge panel will make your job alot easier.
I've been having a few different conversations with people on PMs, most in depth with @tomCTR, about how I fitted my dash, and thought it might be better to put a post about fitting a dash out in the open so others can either learn from it, or add to it with their ideas, suggestions or experience.
Although I will use a Race Technology Dash2 in my examples, there are alot of dashes available from the likes of AEM, AiM, Autometer, Haltech, Racepak, Stack, etc. and the process will be fundamentally the same for all of them.
Mounting
There are alot of options here, from the simple to the extreme:
That said, I feel for most people smoothing out a panel you already have will be the best starting point. Now if you want to see a professional do it please see the following links:
Part 1
Part 2
Part 3
Part 4
For smoothing my dash, I did similar to the linked articles, but where he used ABS discs and plastic blond/glue, I just used fibreglass and resin, but the rest of it was the same:
1) I Didn't take a picture of the first step, which was trimming down the gauge holes, then putting take across the front to hold the fibreglass and resin.
2) Once the tape is removed you need to start the process of smoothing. Here was my first pass of filler.
3) Sanded down. Getting closer.
4) Second pass of filler.
5) Sanded off the second pass then covered in UPOL Plastix. In retrospect I would have used this instead of filler in the early stages, as this has more inherent flexibility in it.
6) All smooth after the various filler stages.
7) Coat of primer to confirm it's smooth.
From this point you have various choices. You can bolt the digital dash on the front of your panel, you can sink the dash into the panel, or you could cut an opening for a bigger panel holding the dash and any buttons you need. For my own dash I went with sinking the dash in with a carbon panel behind:
I finished my dash in Halfords Truck bedliner to give it a textured finish, and for that it's great, but it doesn't seem as hard wearing as I'd like, so if I was to do it again I would probably put paint over the top to try and seal it.
For mounting the dash, again you have different options, though the main two will be:
1) Mounting to the panel itself using tabs
2) Mounting it to the existing housing
So that should get you to the point of having your digital dash physically mounted in your car. Other items I would call out, are that some of the better selling digital dash manufacturers sell vac formed or cast panels ready to accept their dashes like this:
Obviously if they do one for your dash, flushing this into your gauge panel will make your job alot easier.
")